Template and Printing FAQs
FAQs
How to Print a Test Page
Working with Dashleigh Templates on a Mac
How do I use Microsoft Word templates?
I am not sure which template to use.
My Templates are Not Printing Correctly.
The outlines are Showing in My PDF.
The outlines are showing on my Microsoft Word file.
Tips and Tricks for Microsoft Word
"My labels are vertical and I need them horizontal (and vice versa).
We offer several ways to personalize your tags, labels and stickers. For those just getting started, you can choose from Microsoft Word templates- where grid lines and tables will keep your text in line. Or choose PDF and add text via Acrobat, Photoshop or Illustrator.
How to Print a Test Page

Dashleigh Templates for Mac
Converting Microsoft Word to Google Docs: Instructions here
Converting Microsoft Word to Word Perfect: Instructions here
Converting Microsoft Word to Excel: Instructions here
Microsoft Tips & Tricks
Adding a Full Page Background to My Templates
My Templates are Not Printing Correctly.
I Don't Know Which Template to Use.
The easiest and fastest way to get your templates printable is to use the Microsoft word version. PDF tends to work best for those working with Adobe Photoshop and Illustrator.
How do I use Microsoft Word templates?
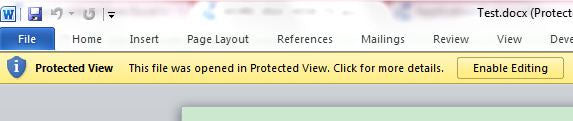
On the template download page, click the link to download the template version you need. Once the template has downloaded- open the file in Microsoft Word. You may need to "enable editing" on some versions. The pop up will show at the very top of the screen for the latest versions of Word and the enable editing button will be yellow.
Once opened, you will see a image that has instructions for getting started. The image will show steps for printing the instructions, as well as getting rid of the image- so you can start customizing your tags. Each Microsoft word template comes with a table to ensure that your text and images will stay in the boundaries of the tags.

The software tends to automatically hide the helpful grid-lines. Once you show the grid-lines- just add text by double clicking within the grid-lines or add a text box.
The Outline are Showing on My Microsoft Word file
On a few of our templates, we have added guide images to show where to lines of the label would be.
You will need to delete these images to have them not show on the final product.

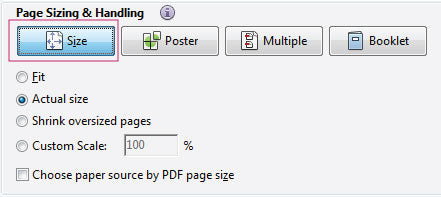
The Outlines are Showing in My PDF.
-
Always Prints: Forces the layer to print.
-
Never Prints: Forces the layer not to print.
-
Prints When Visible: Matches printed output to onscreen visibility.
Note: In Reader, you can open the Layer Properties dialog box, but you cannot change the settings.
Working with Water and Weatherproof Labels: Getting the Most out of Your Waterproof Labels
Rotating Information Horizontally and Vertically
Thank you for your purchase. I am happy to help you. We recommend adding the text and images you want to print and placing it in a text box. Once the label looks good, you can rotate the entire text box to print the labels.
How to Add a Text Box:
- On the Insert tab, in the Text group, click Text Box, and then click Draw Text Box.
- Click in the document, and then drag to draw the text box the size that you want.
- To add text to a text box, click inside the text box, and then type or paste the images you need.
How to Rotate a Text box in Word (Rotate 90 degrees to the left or 90 degrees to the right)
- Click the picture, shape, text box, or WordArt that you want to rotate.
- Do one of the following: To rotate a picture, under Picture Tools, click the Format tab. ..
- In the Arrange group, click Rotate, and then do one of the following:
- Rotate left or right
Once complete, copy and paste the text box into each of the label cells of the table and print.
